

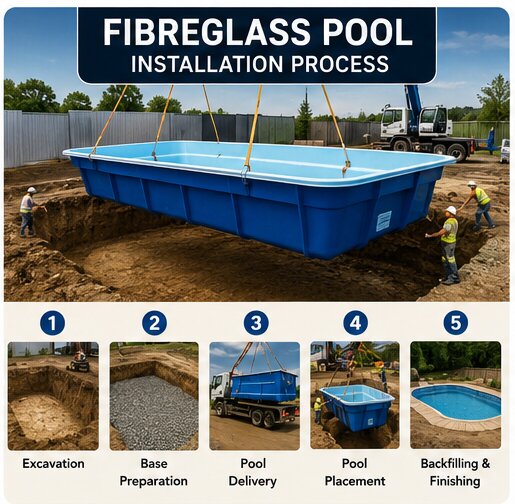
Fibreglass installation is faster than vinyl or concrete because the pool structure arrives essentially finished — manufactured off-site, delivered on a flatbed, and craned into place in a single day. That speed comes with its own set of logistics, though, particularly around delivery access and the backfill material that goes around the shell. This guide walks through every phase from shell order to first swim, with the emphasis on the steps that are genuinely different from other pool types.
Step 1: Shell Selection and Lead Time
The process starts before any site work begins, with choosing your shell from the manufacturer’s catalogue. Lead time from order to delivery varies by manufacturer, shell model availability, and season — typically 2–6 weeks during peak summer, sometimes shorter in the off-season. This lead time runs alongside the permit process in most cases, so ordering early doesn’t necessarily delay construction; it reduces the risk of the shell not being available when the excavation is ready.
Confirm at the time of order:
- The shell colour and finish are what you want — gelcoat is factory-set and can’t be changed after manufacture
- Any factory-integrated features (tanning ledge, bench seating, integrated spa) are included in the order — these can’t be added after the fact
- The shell model’s exact dimensions fit your property setbacks and excavation plan
Step 2: Pre-Delivery Site Preparation
Before the truck arrives, several things need to be confirmed and prepared:
Access route: the shell typically arrives on a standard flatbed truck and must navigate from the nearest accessible road to your property. Most shells are up to 16 feet wide and 40+ feet long — confirm that your street, driveway, and side-yard clearance can accommodate both the truck and the crane that will lift the shell from it.
Overhead clearance: the crane lifts the shell up and over whatever stands between the truck and the excavation — fences, eaves, trees, utility lines. The crane operator will assess this on the day, but flagging any low-clearance obstacles in advance allows your contractor to plan the lift path and equipment.
Utility locate: Ontario One Call must mark all buried services before any digging begins. This is a legal requirement, not optional.
Equipment pad location: confirmed and staked before excavation so plumbing lines are run in the right direction from day one.
Step 3: Excavation
Fibreglass pool excavation is shaped to the shell’s specific geometry, not a generic rectangular hole:
- The excavation follows the shell’s outline, slightly wider and deeper than the shell itself — typically 30–60 cm of clearance on all sides — to allow for backfill material and equipment access during installation
- The floor of the excavation is prepared to match the shell’s floor profile, with any curved areas smoothed to match
- The walls of the excavation are graded at an angle that the soil type can hold safely without collapsing during the installation window
Because the excavation must match the shell precisely, accurate shell dimensions from the manufacturer are needed before excavation day — don’t excavate based on approximate measurements.
Bedding layer: the bottom of the excavation receives a layer of compactable bedding material (typically sand or crushed stone) that will support the shell’s floor. This layer is compacted and levelled carefully before the shell is lowered in — a level base prevents the shell from sitting unevenly, which can stress the structure and make the waterline look uneven once filled.
Duration: fibreglass excavation typically takes 1–3 days depending on pool size and soil conditions.
Step 4: Delivery and Crane Day
Crane day is the most visually dramatic part of the fibreglass installation — the shell lifted from the truck and lowered into the excavated hole, typically in a matter of hours.
The delivery sequence:
- The flatbed truck arrives and positions as close to the excavation as the crane setup allows
- The crane is set up and rigged to the shell using purpose-built lifting straps or spreader bars at the shell’s designated lift points — not just anywhere along the rim
- The shell is lifted clear of the truck, rotated if necessary, and moved over the excavation
- It’s slowly lowered onto the prepared bedding layer
- The crane holds the shell while the first level checks are made and initial adjustments confirmed
Critical lift points: every fibreglass shell has specific engineered lift points designated by the manufacturer. Lifting from incorrect points can crack or permanently deform the shell. If your contractor is attaching lifting straps to the shell, confirm they’re using the manufacturer-specified points.
What can complicate the lift:
- Low overhead utility lines requiring a line clearance (contact your utility provider in advance)
- Insufficient crane reach requiring a longer-boom crane at higher cost
- Wind — cranes typically have operational wind-speed limits; lifts may need to be delayed or rescheduled in high-wind conditions
Step 5: Levelling and Preliminary Plumbing Connections
Once the shell is in the hole, the first priority is confirming it’s level in all planes — side to side and end to end. The shell is shimmed as needed while the crane still holds tension. Getting this right before the crane disconnects matters: making significant level corrections after the crane has left requires partially lifting the shell again.
Preliminary plumbing connections are made through the shell’s pre-drilled ports — typically the main drain, skimmer, and return connections — before backfill closes off access to the shell’s exterior. These connections are made through standard threaded fittings; the shell manufacturer provides the fitting specifications.
Pressure test: before any backfill begins, the plumbing lines should be pressure-tested to confirm all joints are leak-free while they’re still accessible.
Step 6: Backfill — The Critical Step
This is the most technically important phase of fibreglass installation, and the one most commonly done wrong by cutting costs.
What goes around the shell matters: fibreglass is a flexible material, and it depends on the surrounding backfill for structural support. The correct backfill material — specified by the shell manufacturer — is typically pea gravel or clean crushed stone (often 3/4″ clean crushed stone or similar). This material:
- Provides firm, stable support on all sides of the shell
- Drains freely, preventing hydrostatic pressure from building up against the shell during periods of high groundwater
- Doesn’t shift or compress unevenly over time
What should not go around the shell: soil — particularly clay or mixed-debris fill — compacts unevenly, retains water, and can exert uneven pressure on the shell that causes warping, cracking, or bulging over time. Using soil to save on gravel cost is one of the most common shortcuts taken in budget installations, and one of the most consequential.
Backfill is added in layers (lifts), with each layer compacted before the next is added. The shell is kept filled with water as backfill rises to counteract hydrostatic pressure from outside — filling with water and backfilling happen simultaneously, not sequentially.
Step 7: Coping and Waterline
Once backfill reaches the top of the shell and is compacted, coping is installed around the shell’s perimeter. For fibreglass pools, the shell itself typically includes a coping lip or track; the coping material is installed over or alongside this, creating the finished edge between pool and deck.
Common coping choices for fibreglass: pre-cast concrete, natural limestone or travertine, or the shell manufacturer’s integrated composite coping. Unlike concrete pools, the coping profile for fibreglass is somewhat determined by the shell design — not all coping styles work with all shell lip configurations. Confirm compatibility before selecting coping material.
Step 8: Decking
Decking is typically installed after coping is in place, since coping sets the height reference for the surrounding surface. Material choice (poured concrete, interlocking stone, natural stone) is usually scoped and priced separately. See Pool Design Toronto for the design side of this decision.
Step 9: Equipment Installation
The pump, filter, and heater are installed on the equipment pad and connected to the plumbing lines from the pool. For fibreglass pools, equipment sizing should be matched to the shell’s specific volume — the installer should not default to a standard package without confirming it’s appropriately sized.
Pool lighting, automation systems, and any water features are also connected at this stage.
Step 10: Final Fill and Startup
With equipment connected and the enclosure fence either built or confirmed compliant, the pool is filled:
- Filling starts slowly to confirm no unexpected leaks at any fittings as water rises
- Equipment is primed and test-run as water levels increase
- Water chemistry is balanced as the pool reaches full level — no special startup sequence is required for fibreglass the way it is for freshly plastered concrete
Once filled and balanced, the pool typically requires 1–2 weeks of equipment running and chemistry stabilising before it’s ready to swim in comfortably. The Municipal Licensing and Standards inspection in Toronto must be passed before the pool is legally used — see Pool Enclosure Permit Toronto.
Quality Checkpoints for Fibreglass Installations
- Before excavation: confirm shell dimensions and lift point locations from manufacturer spec sheet
- Before crane day: confirm overhead clearances, truck access route, and wind forecast
- During crane set: shell level confirmed in all planes before crane disconnects
- Before backfill: plumbing pressure test completed and documented
- During backfill: gravel/stone material confirmed, water and backfill rising simultaneously
- Before filling: ESA electrical inspection completed; fence enclosure confirmed compliant
Frequently Asked Questions
How long does fibreglass pool installation take from excavation to swimming?
Typically 2–4 weeks of active construction, plus 1–2 weeks of fill and chemistry stabilisation before the pool is comfortably swimmable. Add permit processing time (6–12 weeks in Toronto) before excavation begins.
What happens on crane day?
The shell arrives on a flatbed truck, a crane lifts it from the truck and lowers it into the prepared excavation, and the shell is levelled and preliminarily connected to plumbing — typically all in a single day.
Why does gravel go around a fibreglass pool instead of soil?
Fibreglass depends on its surrounding backfill for structural support. Gravel provides stable, draining, non-shifting support; soil can compact unevenly and retain water, exerting uneven pressure that causes warping or cracking over time.
Can I watch the crane lift?
Yes — most contractors don’t mind a homeowner being present for this. It’s worth being available, since it’s the fastest and most visual moment in the entire build and an opportunity to see the shell’s level confirmed before the crane disconnects.
What if the shell isn’t level after it’s lowered in?
Shimming adjustments are made while the crane still holds tension, before disconnecting. Corrections become significantly more difficult after the crane leaves — which is why taking the time to confirm level before the crane unhooks is worth the delay.
Get a Fibreglass-Specific Quote and Build Plan
Your installation timeline and process depend on your shell choice, your site, and your permit situation.
Contact Easy Pools at (647) 449-9512 for a free, no-obligation consultation on your fibreglass pool project.