

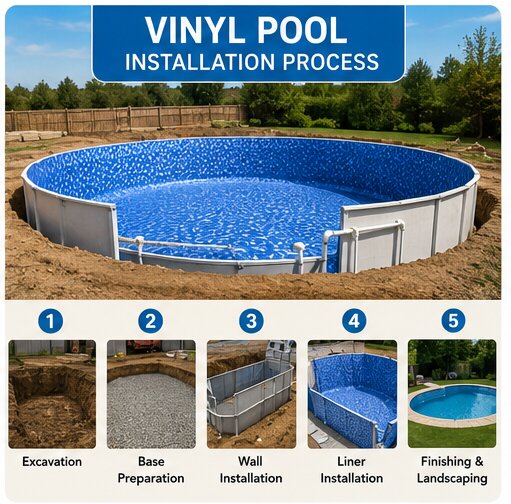
A vinyl liner pool is assembled from components rather than formed in one piece — which makes the build sequence and quality checkpoints quite different from fibreglass or concrete. This guide walks through every phase, with particular attention to wall panel assembly, the floor preparation that protects the liner, and the liner fitting process that determines how the pool looks and performs for the next decade.
Phase 1: Excavation and Bench Cut
Vinyl pool excavation includes a detail not present in fibreglass builds: a horizontal bench cut — a small ledge at the top of the excavated wall where the base of the wall panels will sit. This ledge provides a stable, level footing for the panels before backfill is added.
The floor of the excavation is cut flat, with gently rounded transitions to the walls. Sharp floor-to-wall corners are avoided at this stage because they’ll be refined as part of the floor base work later — trying to cut a perfectly smooth radius with excavation equipment isn’t realistic, so the floor is rough-cut and refined later.
Duration: typically 2–4 days depending on pool size and soil conditions.
Phase 2: Plumbing Rough-In and Pressure Test
Before wall panels go in, underground plumbing runs are laid — main drain lines from the pool floor centre, and the stub-outs for skimmers and return jets at the wall locations. This is the last easy opportunity to confirm pipe routing before the wall structure goes up around it.
Pressure test before panels: a plumbing pressure test at this stage — before panels and backfill cover the lines — is the most accessible time to confirm all joints are leak-free. Any joint failure found here is straightforward to fix; finding one after the pool is filled and backfilled is not.
Phase 3: Wall Panel Assembly
This is the phase most distinctively different from any other pool type. Steel or polymer/resin wall panels are assembled inside the excavated hole, section by section, to form the pool’s perimeter wall.
The assembly sequence:
- Bottom track and base plates are set around the perimeter at the level of the bench cut, providing the footing that each panel will slot into
- Straight panels are inserted into the track and connected horizontally to each other using panel connectors or interlocking flanges
- Corner sections — specifically shaped panels — create the transitions between straight runs, and must be plumb or the whole perimeter accumulates an error
- Top rails connect across the top of the assembled panels, providing the rigidity that will hold the structure together once filled
- Interior bracing is set temporarily to hold the wall system square and plumb while the floor base is installed and initial backfill begins
Steel vs. polymer panels: steel panels are the standard, more affordable option. Polymer/resin panels are the premium alternative — corrosion-resistant and better suited to sites with aggressive soil moisture or where de-icing salt could contact the exterior of the wall. The assembly process is the same; the material determines long-term durability.
Quality checkpoint: before any floor work begins, every panel must be plumb (vertical) and the top rail must be level. A panel that’s out of plumb creates an uneven wall face that the liner will follow — visible once filled. Panel level and plumb should be checked after assembly but before the floor base is installed.
Phase 4: Floor Base Preparation
The floor base is what the liner lies against permanently. It must be smooth, free of sharp objects, and shaped correctly — because anything on or in the floor base eventually telegraphs through the liner to a swimmer’s feet, and any sharp protrusion is a potential puncture point.
Sand base: the simplest and most common approach — clean sand is troweled smooth to the finished floor profile. Sand is forgiving and easy to work, but can compact over years and shift if the pool is ever fully drained.
Vermiculite or sand-cement base: a mixture of sand (or vermiculite) and Portland cement, troweled smooth and allowed to cure. More durable than a pure sand base, holds its shape after curing, and is better suited to pools that might need full draining for service. More labour-intensive to install and repair.
Concrete base: poured and finished concrete — the most durable option, typically used in commercial pools or by owners who want the most stable possible sub-surface. Requires longer cure time before liner installation.
The cove: at the junction between the floor and wall panels, a cove — a curved transition made from packed sand or a foam cove product — is formed along the full perimeter. This prevents the liner from being pulled into a right-angle corner between the floor and wall, which would create a stress point that leads to tears. A well-formed cove is smooth, continuous, and sized appropriately for the liner gauge. A missing or poorly formed cove is one of the most common causes of early liner failure at the wall-floor junction.
Quality checkpoint: before ordering the liner, walk the floor base and run a hand along the full cove. Any debris, sharp objects, or discontinuities in the cove should be corrected before the liner order is placed.
Phase 5: Liner Measurement and Fabrication
Once the wall panels are assembled and the floor base is complete, the pool is measured — precisely — for the custom-fabricated liner. This measurement drives the liner pattern sent to the manufacturer, so it must reflect the actual built dimensions, not the original design drawings.
The liner is manufactured off-site to these dimensions, cut and welded from PVC sheet. Fabrication typically takes 1–3 weeks. This is the mid-project quiet period — nothing visible is happening to the pool, but the liner is being made. Rushing the manufacturer or measuring inaccurately both result in a liner that doesn’t fit properly.
During this window, coping, decking, and equipment work can proceed around the open pool.
Phase 6: Liner Installation
Liner installation day is one of the more technical phases of a vinyl build — the liner must be positioned correctly, seated uniformly, and vacuum-formed to the pool’s shape before water locks it in place.
The installation sequence:
- Liner delivery and unfolding: the liner arrives rolled or folded. It’s carefully unfolded inside the pool to avoid creasing or tearing, then draped across the floor and up the walls.
- Bead seating: the liner’s upper edge has a bead profile — a shaped lip that clips into a receiver track at the top of the wall panels. The bead is seated all the way around the pool’s perimeter before vacuum is applied. If the bead isn’t seated uniformly, the liner will pull unevenly.
- Vacuum application: a shop vacuum connected through a skimmer port or small perforation draws air out from behind the liner, creating suction that pulls the liner snugly against the floor base and walls. This is what seats the liner into all the floor corners and the cove — without vacuum, the liner would float and wrinkle when water is added.
- Simultaneous filling: water is introduced at the bottom of the pool while vacuum is maintained. The water’s weight progressively locks the liner in position as filling rises.
- Wrinkle correction: as the liner fills, any wrinkles visible in the lower portion of the pool must be worked out before the water rises past them — water weight above a wrinkle locks it in place permanently. An experienced installer watches this actively during the fill and works wrinkles toward the walls with a soft tool. Once water is past mid-depth, wrinkle correction becomes very difficult.
Quality checkpoint: stop the fill periodically during the first 6–12 inches of water and check the full floor surface for wrinkles while they’re still workable. This is the last practical opportunity to correct them.
Phase 7: Plumbing and Electrical Connections
As the pool fills, plumbing connections are made through the skimmer and return fittings in the wall panels. The liner is cut at each fitting location and face-plate assemblies are installed — this must be done neatly and sealed correctly, as liner-to-fitting connections are a common leak point if not installed properly.
Electrical connections for equipment and lighting are completed at the equipment pad. An ESA (Electrical Safety Authority) permit and inspection is required for all pool electrical work in Ontario.
Phase 8: Coping and Decking
Coping for a vinyl pool covers the top rail and bead receiver track, finishing the transition from the pool’s interior to the deck surface. The coping material sits on or over the top rail — aluminum coping is the traditional, most affordable option, while stone or concrete coping provides a more premium look and matches what’s commonly seen on concrete pools.
Decking follows coping, set to the height reference the coping establishes.
Phase 9: Equipment Installation and Startup
The pump, filter, heater, and any automation equipment are installed and connected. For vinyl pools, equipment sizing should match the pool’s volume — the standard package on a large vinyl pool may underperform if it was specified for a smaller one.
Once equipment is running and water chemistry is balanced, the pool is typically swimmable within 1–2 weeks after filling — no extended cure period the way concrete requires.
The Municipal Licensing and Standards fence inspection in Toronto must be passed before the pool is legally used.
Quality Checkpoints Summary
| Phase | What to Check |
| After excavation | Bench cut level and consistent all the way around |
| After plumbing rough-in | Pressure test completed before panels go in |
| After panel assembly | Every panel plumb; top rail level all the way around |
| After floor base | No sharp objects; cove smooth and continuous |
| Before liner order | Measurements taken from the actual built pool, not design drawings |
| During liner installation | Bead seated uniformly; wrinkles corrected before water rises past them |
| At fitting installation | Each skimmer and return face-plate sealed correctly with no gaps |
Frequently Asked Questions
How long does it take to install a vinyl liner pool?
Typically 4–8 weeks from excavation to filling, including the 1–3 week liner fabrication window. Add 6–12 weeks of permit processing in Toronto before excavation begins.
What is a cove and why does it matter?
A cove is the curved sand or foam transition between the floor and wall of a vinyl pool. It prevents the liner from being pulled into a sharp right-angle corner, which would create a stress point that leads to tearing at the wall-floor junction.
Why does the liner installation require a vacuum?
Vacuum sucks air out from behind the liner, pulling it snugly against the floor base and walls before water is added. Without vacuum, the liner floats unevenly and wrinkles form that become permanent once filled.
Can wrinkles be fixed after the pool is full?
Minor wrinkles in a newly installed liner can sometimes be worked out with a soft brush or pool broom. Significant wrinkles locked in by water pressure typically require partially draining the pool to address — reason enough to take wrinkle correction seriously during the fill.
What happens if the liner bead isn’t seated properly?
The liner will pull unevenly as filling proceeds, potentially pulling the bead out of the track in sections and causing visible sagging or water intrusion behind the coping. Reseating a bead after filling requires partially draining the pool.
Get a Vinyl-Specific Quote and Build Plan
Your timeline and process depend on your pool’s shape, your chosen liner, and your site conditions.
Contact Easy Pools at (647) 449-9512 for a free, no-obligation consultation on your vinyl pool project.