

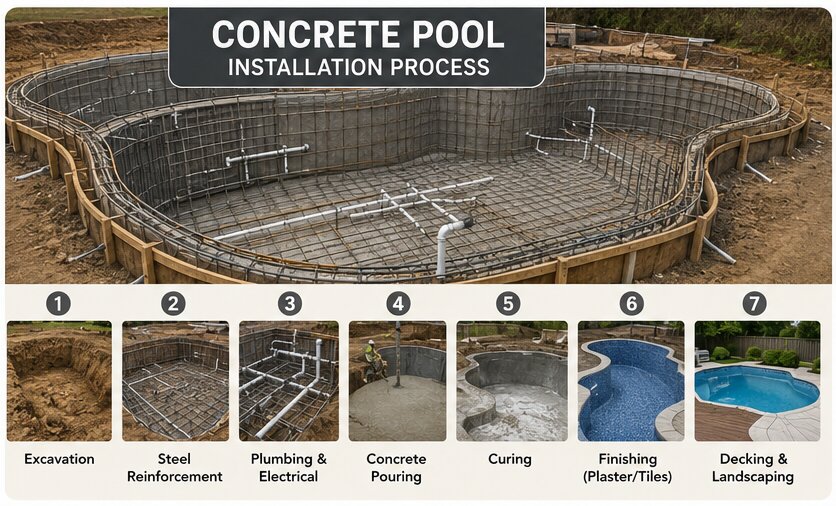
A concrete pool is the most complex build of any residential pool type — built entirely on site, phase by phase, with a mandatory multi-week curing period that separates it from every other material. This guide covers each phase in sequence, with particular depth on the four that are genuinely unique to concrete: rebar installation, gunite application, curing, and the interior finishing and startup sequence that determines how the pool performs for the next decade.
Phase 1: Design Finalization and Engineering
Before excavation begins on a concrete pool, the design must be finalized in more detail than other pool types require. Because concrete is formed entirely on site, every dimension, feature, and built-in element needs to be in the plan before the shovel goes in — relocating a tanning ledge or adding an integrated spa after excavation is far more disruptive than it would be on paper.
For pools with structural complexity — infinity edges, multi-level designs, sloped lots, or proximity to existing foundations — engineering drawings are typically required before permits are issued. This is worth building into your planning timeline, since engineering reviews can take 2–4 weeks independently of the permit process. See Pool Permits Toronto for how this interacts with the permit sequence.
Phase 2: Excavation
Concrete pool excavation differs from fibreglass and vinyl in one fundamental way: the excavation itself is the form template. The shape dug into the ground is the shape the gunite will follow, so irregular shapes, built-in benches, and multi-level designs are all established in the excavation phase.
This requires more excavation skill and precision than a fibreglass build (where the shell dictates the shape) or a vinyl build (where wall panels define the perimeter). A complex freeform design needs careful hand-shaping at curves and transitions, particularly at the floor-to-wall radius.
Excavation for concrete also goes slightly larger than the finished pool dimensions to allow space for rebar clearance on all surfaces. The excavation walls and floor become the back surface of the gunite shell.
Duration: typically 2–5 days depending on design complexity and soil conditions. Rocky soil requiring equipment changes can extend this significantly.
Phase 3: Plumbing Rough-In
Underground plumbing runs are installed before rebar begins — this is the last accessible phase for routing main drain lines, skimmer stubs, and return lines under the pool floor. Getting this right matters: rerouting buried plumbing after gunite is applied means breaking through a concrete shell.
Main drains: modern pool code requires anti-entrapment main drain covers and, typically, dual main drains separated by a minimum distance. For concrete pools, the main drain body is cast into the gunite shell during application.
Pressure test: plumbing lines should be pressure-tested before rebar or gunite covers them. Any joint failure is straightforward to fix at this stage; finding it after the shell is formed means cutting through concrete.
Phase 4: Rebar Installation
This is the first phase that’s entirely unique to concrete. Steel rebar — typically 3/8″ or 1/2″ diameter — is tied together using wire to form a continuous reinforcing skeleton that follows the pool’s shape on all surfaces.
Standard rebar spacing is typically 6 inches on centre in both directions — a grid pattern covering the floor, walls, and any built-in features. Closer spacing is used at structural stress points like corners, steps, and where the shell changes direction significantly.
Coverage requirements: the rebar must sit at a sufficient distance from the excavation surface on all sides so that gunite can fully encapsulate it. A minimum of 3 inches of gunite coverage over the rebar is standard — the inspector or engineer confirms this is achievable before gunite begins. Rebar sitting too close to the surface can lead to rust staining or structural weakness as moisture reaches the steel over time.
Inspection: in many jurisdictions, the rebar installation is inspected before gunite application begins. This confirms spacing, coverage positioning, and structural connections at corners and features. Don’t rush gunite application before this sign-off.
Duration: rebar installation typically takes 3–7 days depending on pool size and feature complexity.
Phase 5: Gunite or Shotcrete Application
This is the signature step of concrete pool construction — and the one most frequently discussed in terms of quality variation between contractors.
Gunite vs. shotcrete: both are concrete applied under pressure through a hose — the distinction is in how they’re mixed. Gunite mixes dry materials at the nozzle with water added just before application; shotcrete is pre-mixed wet concrete delivered and applied through a hose. Both produce structurally sound concrete when properly applied; the choice is largely contractor-specific.
The application process:
- The gunite nozzle is held at the optimal distance and angle from the surface — typically 2–4 feet, at an angle that minimizes rebound
- Concrete is applied in continuous passes, starting at the floor and working upward
- Each pass is built up gradually — gunite can’t be applied in one thick layer without risking voids behind the rebar
- The nozzle operator must maintain consistent pressure and angle throughout — inconsistent application creates weak spots
The rebound problem: as gunite is applied, a portion of the material bounces off the surface — “rebound” — and falls to the pool floor. This rebound material is weaker than properly applied gunite (it’s lost its bonding properties) and must be removed before it’s incorporated into subsequent applications or covered by the finish. Leaving rebound in the pool is one of the most documented ways concrete pool quality is compromised — a competent nozzle crew removes it continuously during application. Ask your contractor explicitly about their rebound management practice.
Shell thickness: typically 8–12 inches of gunite on walls and floor, sufficient to fully encapsulate the rebar with adequate coverage on both sides.
Duration: gunite application for a standard residential pool typically takes 1–3 days.
Phase 6: Curing — The Critical Path
Once gunite is applied, it must cure before any interior finishing can begin. This is the mandatory waiting period that makes concrete pools take longer than any other type.
Why curing takes time: concrete achieves its structural strength progressively over 28 days, following a predictable hydration curve. The first few days see rapid strength gain; the curve flattens as curing continues. Most concrete pool specifications require a minimum of 3–4 weeks before interior finish work begins — not because the concrete is soft, but because the chemical process of hydration needs to complete sufficiently before the shell is subjected to the differential stress of a finish application and eventual water pressure.
Keeping the shell moist during curing: concrete cures through hydration, not drying. A shell that dries out too quickly develops surface cracks. During the curing period, the shell is typically kept moist — sprayed with water regularly, or covered with damp burlap — particularly in hot or dry weather.
What happens during curing: this isn’t idle time. Plumbing connections are finalized, electrical rough-in is completed, the equipment pad is poured, coping is installed, and decking can begin. Curing is the structural shell’s timeline, not the project’s.
Phase 7: Tile and Waterline Work
Once the shell has cured sufficiently, tile work is installed — typically beginning with the waterline tile band (the row of decorative or functional tile at the water’s surface), followed by any full interior tile application on steps, benches, or the full shell.
Tile installation requires careful surface preparation: the cured gunite is ground smooth and cleaned of any surface contamination before adhesive is applied. Grout is applied after tile is set and fully cured.
For pools with a tile interior finish, this phase takes the most time — a full tile interior can take 2–4 weeks depending on the extent of work and complexity of the tile pattern.
Phase 8: Coping Installation
Coping is installed over the shell’s top edge and forms the finished transition between the pool and deck. For concrete pools, coping options are broader than for fibreglass or vinyl — natural stone, pre-cast concrete, brick, or poured cantilever concrete can all be used, and the coping profile can be designed to integrate flush with the deck or project over the pool’s edge.
Phase 9: Interior Finish Application
The interior finish is the final material applied before filling — it becomes the surface swimmers touch and the material that defines the pool’s colour.
Plaster (marcite): white cement mixed with marble aggregate, troweled wet over the cured shell. Plaster must go on continuously without stopping — joints and cold seams create weak points. A skilled plaster crew works quickly and methodically from one end to the other.
Pebble and quartz finishes: an aggregate finish (pebble, quartz, or glass bead) is applied similarly to plaster but includes exposed aggregate that’s washed and revealed during application. These finishes take longer to apply and are more labour-intensive than plain plaster.
Tile interiors: if the entire interior is tiled, no plaster is applied.
Critical timing: filling must begin within hours of plaster completion — a plastered shell that dries out before filling begins can crack, delaminate, or hydrate unevenly. The plaster crew and filling crew must be coordinated in advance.
Phase 10: The Plaster Startup Sequence
This is the most involved startup of any pool type, and skipping or rushing it is one of the most common causes of premature plaster deterioration.
Why startup matters: fresh plaster leaches calcium hydroxide into the pool water during the first days and weeks. Left unmanaged, this can cause calcium scaling on the plaster surface, white cloudiness, and uneven finish. The startup sequence is designed to manage this leaching period.
A standard startup sequence:
- Filling begins immediately after plaster application and continues until full
- Water is circulated continuously from the moment the pump can run (typically when water reaches the skimmer)
- pH, alkalinity, and calcium hardness are tested and adjusted at regular intervals — typically daily for the first week. Fresh plaster raises pH significantly, and acid additions are typically needed repeatedly
- Brushing the plaster surface is done daily for the first 2 weeks using a nylon-bristle brush — not a steel brush, which scratches plaster — to remove surface calcium deposits before they harden
- No abrasive cleaning equipment for the first 30 days; the plaster is still curing and susceptible to surface damage
Swimming: most concrete pool installers recommend waiting 2–4 weeks after filling before the pool is used — both for the plaster startup to complete and to allow the pool’s chemistry to fully stabilise.
Quality Checkpoints Summary
| Phase | What to Confirm |
| Before excavation | All design features finalized; engineering drawings complete |
| After plumbing rough-in | Pressure test completed |
| After rebar | Spacing consistent; minimum coverage from all surfaces confirmed |
| Before gunite | Rebar inspection signed off |
| During gunite | Rebound removed continuously; not incorporated |
| During curing | Shell kept moist; no premature surface drying |
| Before plaster | Shell surface properly ground and cleaned |
| Plaster day | Filling crew coordinated; fill begins same day as plaster completes |
| First 2 weeks | Daily brushing; pH and alkalinity adjusted regularly |
Frequently Asked Questions
What is gunite and how is it applied?
Gunite is concrete applied under pressure through a hose — dry materials are mixed with water at the nozzle and sprayed onto the rebar skeleton, building up the pool’s shell on all surfaces.
What is rebound and why does it matter?
Rebound is gunite that bounces off the surface during application and falls to the pool floor. It’s weaker than properly applied material and must be removed, not incorporated into the shell — a common quality shortcut with long-term structural consequences.
Why does a concrete pool take so much longer to build?
The gunite shell requires 3–4 weeks of curing before interior finishing can begin — a mandatory wait that’s specific to concrete and doesn’t apply to fibreglass or vinyl.
What is the plaster startup sequence?
A 2-week period after filling during which the pool runs continuously, pH and alkalinity are adjusted daily, and the plaster is brushed daily to prevent calcium scaling while the surface cures in contact with water.
Can I swim in a new concrete pool right away?
No — most installers recommend waiting 2–4 weeks after filling for the plaster startup sequence to complete and pool chemistry to stabilise before the pool is used.
Get a Concrete Build Consultation
Concrete’s complexity makes the contractor selection and construction process more consequential than with other pool types.
Contact Easy Pools at (647) 449-9512 for a free, no-obligation consultation on your custom concrete pool project.