

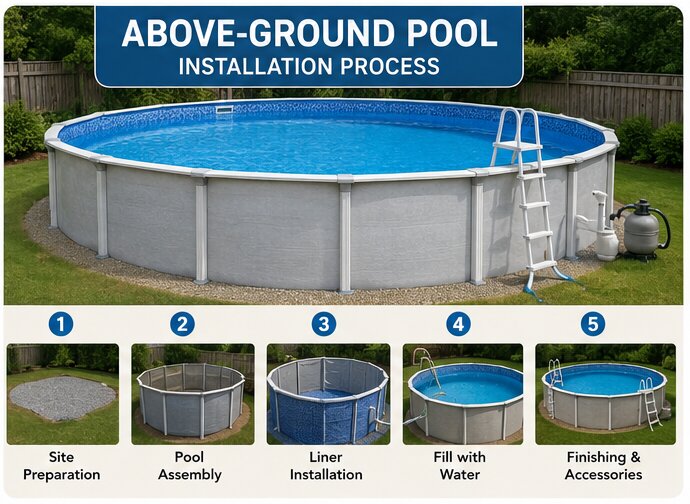
Above-ground pool installation is faster and simpler than any inground pool build — most are swimmable within a few days of starting. But the steps that are often underestimated — particularly ground levelling and liner fitting — have consequences that last the life of the pool. This guide covers the full installation sequence with the depth each phase actually deserves.
Before You Start: Site Assessment
Two things must be confirmed before any installation work begins:
Level ground: above-ground pools require a level installation surface. The industry standard is no more than 1–2 inches of variance across the pool’s entire footprint. For a 24-foot round pool, even a gentle slope at property level translates into a significant lean at the pool wall — visible in the water’s surface from outside the pool. If your site varies more than this, the ground needs to be prepared before installation, not shimmed afterward.
Underground utilities: Ontario One Call must mark buried gas, hydro, telecom, and water lines before any ground is broken — this applies to above-ground pools too, since base preparation and upright installation can disturb buried services. Your contractor initiates this; confirm it’s been done.
Permits and enclosure: above-ground pools that exceed 600mm (approximately 24 inches) depth require a compliant safety enclosure in Toronto, the same as inground pools. Confirm permit requirements before installation begins, not after the pool is up. See Pool Permits Toronto.
Phase 1: Ground Levelling
This is the most consequential phase of an above-ground installation, and the one most commonly underestimated in DIY and budget installations.
Why level matters so much: a pool wall system that’s installed out of level creates structural stress at every connection point — as water fills and the liner pushes outward uniformly, an unlevel frame transfers uneven load to the uprights, top rails, and bottom track. Over time, a significantly unlevel installation can cause wall distortion, connection failures, or the pool’s collapse.
How to level the site:
- The high side of a sloped site is excavated down, rather than filling the low side up — adding soil to bring a low spot up creates an unstable base that can compact, wash out, or settle unevenly under the pool’s weight
- A laser level or long spirit level confirms level across the full footprint, not just a few spots
- For pools on a significant slope, a concrete or paver base for the uprights may be installed — these small pads prevent the uprights from sinking into soft or uneven soil
What professional installation addresses that DIY often misses: the proper levelling method requires removing material from the high side, not adding to the low. Many DIY installations attempt to build up low spots with sand — a common error that creates a soft, potentially shifting foundation.
Phase 2: Base Preparation
Once the site is level, the base material that will support the pool’s floor is installed. The base serves two purposes: protecting the liner from ground contact with stones or roots, and providing a smooth, comfortable surface underfoot.
Sand base: the most common and cost-effective option. A 2–4 inch layer of clean masonry sand is spread and compacted across the pool’s footprint, then smoothed with a float. Key detail: the sand must be installed on firm, compacted native soil — not on top of loose fill or disturbed ground. The edges of the sand base are shaped into a gentle upward curve (a cove) at the transition to the wall, the same function as the cove in a vinyl inground pool, preventing the liner from being pulled into a sharp floor-to-wall angle.
Foam padding: a pre-cut foam pad sized to the pool’s floor dimensions is laid on the levelled ground before the wall goes up. Foam provides cushion underfoot and protects the liner from puncture by small stones or root protrusions that sand might not fully cover. Foam pads are often used in combination with a sand base — foam on top of sand — for the most protective floor surface.
Concrete or pavers for uprights: the pool’s vertical support uprights can sit on small concrete pads or pavers rather than directly on soil, preventing sinking or settling under the concentrated load of each upright. This is particularly worth doing on soft or clay-heavy soil.
Phase 3: Bottom Track Layout
The bottom track — the base channel the pool wall slots into — is laid out on the prepared base to define the pool’s exact footprint.
For round pools: the track is laid in a circle, measured from the centre point outward. Getting the circle true to shape requires measuring from the centre to every track connection point — eyeballing a circle from the outside creates a distorted shape that affects both the liner fit and the structural load distribution.
For oval and rectangular pools: the straight side-wall tracks are laid first, then the curved end-cap tracks are connected. Oval pools require additional structural support — buttresses or straps — that brace the long walls against the outward water pressure the curved ends would otherwise deflect unevenly.
The bottom track is staked or anchored in place before the wall is inserted.
Phase 4: Wall Installation
Above-ground pool walls are typically a single continuous steel or resin sheet, coiled in the box, that’s unrolled and fed into the bottom track as it circles the perimeter.
The wall installation sequence:
- The coiled wall is positioned at the track’s starting point
- One person unrolls the wall while another guides it into the bottom track channel
- The wall travels around the full perimeter until the two ends meet
- The ends are fastened together with bolted connectors or a dedicated seam plate
- Wall uprights (vertical support posts) are installed at regular intervals, typically every 4–6 feet, clamping to the wall and bottom track
Checking plumb: each upright is checked for plumb — a wall that leans in or out at any point will cause the liner to fit poorly at that section and may stress the top rail connections. Uprights are adjusted before top rails are installed.
Phase 5: Top Rails and Bracing
Top rails connect across the top of the uprights, providing the lateral rigidity that holds the wall in shape and carries the tension of the filled liner. Each top rail connects at both ends to adjacent uprights using clips or bolts.
For oval pools: the long straight sides receive additional external bracing — typically triangular buttresses or support straps extending from the uprights outward — to counteract the lateral force of water pushing the long sides outward. These buttresses need clearance space around the pool perimeter and factor into how close the pool can be to fencing or other structures.
Once all top rails are in place, the top of the pool wall is complete and ready for liner installation.
Phase 6: Liner Fitting
Above-ground liner installation uses the same fundamental vacuum technique as vinyl inground pools, with a few differences specific to the above-ground configuration.
Liner types for above-ground pools:
- Overlap liner: the simplest type — the liner drapes over the top of the wall and is held in place by plastic coping strips clipped over it. Less finished-looking but straightforward to install and replace.
- Beaded liner: clips into a bead receiver track installed at the top of the wall, creating a cleaner finished edge. More common on higher-end above-ground pools.
- Unibead (J-hook) liner: a versatile liner that can be hung from the top rail like an overlap or used with a bead receiver — allows the liner to be installed either way.
The installation sequence:
- The liner is unfolded inside the pool and positioned to cover the floor and walls, with excess draped over the top
- For beaded or unibead liners, the bead is seated in the receiver track all the way around the top before filling begins
- A shop vacuum is connected through a skimmer port or small hole to draw air out from behind the liner, pulling it snugly against the floor base and walls
- Water filling begins while vacuum is maintained — the water’s weight progressively locks the liner in place
- Wrinkles in the floor are worked out while the water level is still low — below 6 inches is the last practical window for significant wrinkle correction
Quality checkpoint: the liner should lie smooth against the floor and curve smoothly into the wall. Any visible wrinkles in the floor should be worked toward the walls using a soft brush or rounded tool while water is still low enough to allow movement.
Phase 7: Equipment Connection
The pump and filter are connected to the pool through the skimmer inlet and return fittings built into the wall. For above-ground pools, these connections are typically threaded fittings installed through the wall during the liner fitting step.
Electrical: the pump and any heater require proper electrical connection. In Ontario, an ESA permit and inspection is required for hardwired pool electrical work — even for above-ground pool pumps connected to dedicated outdoor circuits. Confirm with your electrician.
Heaters: gas and heat pump heaters for above-ground pools are connected to the return line between the pump/filter and the pool. Given the relatively small water volume of an above-ground pool, heating is more economically viable here than people expect.
Phase 8: Filling and Startup
Filling an above-ground pool typically takes 12–36 hours depending on pool volume and water pressure. As water rises:
- The liner is progressively weighted and seated against the floor and walls by the water
- Equipment is primed and tested once water reaches the skimmer level
- Water chemistry (pH, alkalinity, sanitiser) is balanced as the pool fills and after it reaches full level
The pool is typically ready to swim within 1–3 days of filling, once chemistry is balanced — no extended cure period required.
DIY vs. Professional Installation
Smaller above-ground pools (under 18 feet round) are genuinely manageable as a DIY project for mechanically capable homeowners with the right tools. The most common DIY errors — and where professional installation adds real value — are:
- Levelling: underestimating slope and building up low spots rather than cutting the high side
- Track layout: an out-of-true circle affects liner fit and structural load
- Liner installation: inadequate vacuum, allowing wrinkles to set before they’re worked out
- Electrical: incorrect wiring or skipping the ESA permit
For larger pools (21 feet and up), oval or rectangular pools, and any pool with significant site preparation needed, professional installation typically delivers a meaningfully better result than DIY.
Quality Checkpoints
| Phase | What to Check |
| Before installation | Level variance across footprint ≤ 2 inches; utilities located |
| After base prep | Sand smooth and firm; cove formed consistently around perimeter |
| Bottom track | True circle or rectangle; no gaps or misalignments |
| Wall installation | Wall seated fully in track; seam fastened securely |
| Uprights | Every upright plumb; no lean in or out |
| Liner installation | Bead seated uniformly; wrinkles worked out before water rises past 6 inches |
| Equipment | Fittings leak-free; electrical properly connected and inspected |
Frequently Asked Questions
How long does above-ground pool installation take?
Most professionally installed above-ground pools are complete in 2–5 days, depending on size and site preparation required. Filling adds another 12–36 hours.
Why does the ground need to be so level?
Even a 2-inch slope across a pool’s footprint creates visible lean in the water surface and structural stress at connection points. Filling a low spot with sand is a common DIY error — the correct method is to lower the high side, not build up the low side.
What goes under an above-ground pool?
Typically a 2–4 inch layer of compacted masonry sand, sometimes with a foam pad on top for added liner protection. The base sits on firm native soil — not on loose fill or disturbed ground.
Can I install an above-ground pool on a slope?
Not without levelling work first. The site must be brought to within 1–2 inches of level across the full pool footprint before installation begins. Semi-inground-capable models can partially accommodate a slope — see Semi-Inground Pools.
Do above-ground pools need a permit in Toronto?
Once water depth exceeds 600mm (approximately 24 inches), a pool enclosure (fence) permit is required in Toronto, the same as for inground pools. An ESA permit for electrical work is also required.
Get a Professional Assessment for Your Site
Whether your site is ready for an above-ground installation — or needs work first — is easiest to determine with a professional visit.
Contact Easy Pools at (647) 449-9512 for a free, no-obligation quote on your above-ground pool project.